Showing posts with label Fusion Magazine. Show all posts

Sunday, April 5, 2015

Things you need to know about mesh bodies (Part 3)

This article was published in Fusion Magazine, April 2015. Click for the magazine!

Greetings everybody! We know, now, what a mesh body is and what we can expect with it. We also know that in order to use mesh clothes with a mesh body, we'll need to use a HUD that will hide slices of the body to avoid pokethrough.

Mesh bodies offer another alternative, for clothing. They may offer two or three extra layers, to wear painted clothes similar to the clothing system layers. These extra layers are usually organized like the SL avatar: a tattoo layer, to wear tattoos, or body make up... then an underwear layer, and then a clothing layer, which tends to be a little loose over the mesh body.

We will not be discussing here whether this is a step forward or a step back. The relevant thing is that mesh bodies do offer this option, and what matters to us is: how do we get those painted clothes over our mesh body?

By using something called appliers.

Appliers are scripted HUDs that will communicate with the mesh body, giving it specific instructions, i.e. which texture to apply over which of the available layers. Each mesh body has its own scripting system. This means that we would need appliers that work for our mesh body, in order to use them. If we see an applier product that explicitly says it will work with our mesh body/attachment, then we can purchase it, confident that it will work.

With so many mesh bodies and other parts, it sounds like this is a nightmare for applier creators. And it was, until a set of scripts called Omega came to life. The Omega set of scripts allows clothing designers to create one applier HUD, and this will work in all bodies that support Omega. Maitreya Lara and Belleza Venus, two of the most used mesh bodies at the moment, support the Omega system.

We have to purchase this set of scripts by teleporting to the Love N Lust Designs location (currently at http://maps.secondlife.com/secondlife/Jacuma/79/77/25, but double check in case they moved). Then either we spend L$99 for the kit corresponding to our mesh body/attachment, or we may join their group, and purchase it for L$1 or L$3. At the moment of this writing, those kits are on the first floor. Kits are also available on Marketplace. Just type omega system kit in the search box. Then, unpack the kit(s) in your inventory, if they were packed.

Once we have the kit that corresponds to our mesh body/attachment, what do we do? The procedure is a little different, depending on the mesh body. I will describe the procedure for two of the three mesh bodies I had the chance to try out: Maitreya Lara and Belleza Venus.

Maitreya Lara: The kit for this body includes a relay HUD. Simply, wear this HUD while at the same time you're wearing a HUD for your clothes. The picture shows an example.

Figure 1.1: Maitreya's relay, its body HUD, and an Omega applier HUD

We do not have to click anything on this relay HUD. So we can resize it to a small size, like in the picture, so it occupies the least possible space on our screen. Make sure that you're showing the corresponding clothing layers on the mesh body. Toggle on/off if in doubt; the script could be remembering a wrong state for them, and all you have to do is toggle again.

Notice also that whenever we select what we want to wear, by clicking on the HUD, a popup menu will appear, asking us to which layer we want the clothes applied (since version 2 of the body).

Figure 1.2: Pop-up menu when clicking on the Omega applier HUD,
to select on which layer the clothes should be applied

Belleza Venus: This kit includes an installer HUD. This will be a one-time operation, and it will not be necessary to wear a relay when we want to use Omega appliers. This installer HUD is named Omega System Installer - Belleza.

First, we have to wear Belleza's body. After this, we wear the installer HUD, and click on it. We will receive the following message in local (nearby) chat, like the picture shows: Thank you for Activating the Omega System!

Figure 1.3: Belleza Installer, notifying of success

We can now detach the installer, and use the Omega appliers we own. At this point, we do not need a relay. The body is ready to show the textures sent by the Omega applier.

One note, though: Since there are three versions of the body included, we need to activate the Omega system for each one of them. The three versions are: full body; body with hands but no feet, to use Slink feet, and body with no hands and no feet, to use Slink hands and feet.

Using this body, we have to make sure that the corresponding clothing layers we click on the Omega applier are visible. We have to wear Belleza's body HUD, to make sure of this. Once we're sure, we can detach Belleza's HUD and just use the Omega applier.

Figure 1.4: Using Omega appliers with Belleza

If you own other mesh bodies/attachments that support Omega, you may have to rez the item on the ground and drop a script inside, then take it back into your inventory. (That is the case with Wowmeh.) Follow the directions included in their documentation notecard. Keep in mind that you will find, together and on top, directions for the final user (the one who simply wants to dress up), and then for the creator who needs to prepare the HUDs. Unless you plan on creating applier HUDs, we are in the first case.

And with this, the mini series on mesh bodies is complete. Enjoy your SL.

Saturday, March 7, 2015

Things you need to know about mesh bodies (Part 2)

This article was published in Fusion Magazine, March 2015. Click for the magazine!

Greetings everybody! In the previous issue of Fusion, we started defining what a mesh body is, what the UVs of the mesh body are, and why this means a lot more work for skin and clothes creators... Particularly when some parts do not conform to the SL avatar UVs.

In this issue, we're going to talk about alpha zones.

Similarly to when we wear clothes over our SL avatar, some clothes will completely cover the avatar in the areas they occupy, and some other clothes won't, resulting in the effect that the mesh body pokes out of the clothes. When using the SL avatar, the solution consists of using a special clothing layer called the alpha layer. These alpha layers, as we know, will make the indicated areas of the SL avatar transparent. In the process of rebaking, the server shows the avatar's skin, minus the alpha areas indicated in the alpha layer.

We might think that the same process could be translated to mesh bodies: Have a texture as an alpha layer, and apply it to the body. The bad news: Currently, we cannot do this to prims (Remember that mesh items, in the end, are also prims.)

That's why creators of mesh bodies adopt this approach: They decide where to create slices of the body (alpha cuts, or alpha zones), and then, by using a HUD, a script makes those alpha zones hide or show, as needed.

Maitreya's HUD
Belleza's HUD
Slink's HUD, v1 (the updated body was released after this article was ready to publish)

Now, keep this in mind: Each mesh prim may have a maximum of eight texturable faces. This means that for every eight alpha cuts, maximum, a new prim will be required, to be able to have more alpha cuts. It's not something that affects the final user, but when you ask to a creator to make more alpha cuts in their body HUDs... remember that this creates more technical issues for them. They can be overcome, but thank them for taking all the hassle.

We'll finish this issue with a note: If you're wearing a mesh body, and you have to alpha all of it, to wear your mesh clothes... just take the mesh body off! Your graphics card will thank you for it, and the graphics cards of those around you will, too.

The reason? Transparent or not, that geometry is still there, and so, is still transmitted. We don't want to add extra stress to servers and our own computer (and those of people around). Living in SL is also living in a community; be the nice neighbour and try to minimize the impact you cause on others' machines.

That's it for this issue! We'll finish the mini series in the next one, talking about appliers and the Omega system. Enjoy your SL.

Tuesday, February 3, 2015

Things you need to know about mesh bodies (Part 1)

This article was published in Fusion Magazine, February 2015. Click for the magazine!

Who hasn't heard about mesh bodies nowadays? Like mesh hands and feet did before, they improve the appearance of our avatar, making it quite smoother than the default SL avatar. If you're interested in acquiring one, or even if you already have purchased one (or more than one), this mini series will clarify a few key concepts.

Daily, I see questions about what can/cannot be done with mesh bodies, or wondering if scripts could do things to them that are simply not possible. I also see questions about appliers, and particularly, the Omega applier. My goal is to take the mystery out of all this.

First of all: What is a mesh body? Technically, a mesh body is a set of linked SL primitives of mesh type, containing data about the geometry defining it, how this geometry should conform to the SL avatar and changes in some sliders (rigged mesh), and the textures to be applied.

It is important to realize that mesh objects, no matter how complex their geometry, are still seen as fancy boxes by the server, fancy boxes that have several faces that can be easily textured by scripts.


Figure 1. This is a mesh body too. Not so fancy, but it illustrates the idea of several linked objects and faces that can be textured

Also, mesh bodies are made of more pieces than the very simple concept shown in the picture. One of the reasons is because of the alpha zones and the fact that each mesh primitive may have up to eight different faces to be textured. If a ninth face is needed, then another mesh primitive has to be used. But let's not confuse ourselves with this yet.

Before that, let's talk about the naked skin shown on a mesh body. Later in the series we will get into clothing and the alpha zones.

Within the modelling program, whether this is Blender or others, we have several ways to texture a mesh. But because this mesh will be later exported and uploaded to SL, the mesh needs to be unwrapped. What does this mean? It means that we have to lay flat our mesh object (so textures can be created), creating a map, or guides if you will, indicating which point of the mesh will be textured by which pixel of the texture.

In order to create a texture that will fit that mesh object, we have to use these guides, painting by following its shape. We may hear that those guides are the UVs of the mesh object. It's good to be familiarized with the general idea: The UV of a mesh can be understood as the guides used to paint the texture. Of course, this is a very simplistic explanation of the term UV, but remember: the purpose of this mini series is understanding some basic concepts. We don't need to know all the technical details in order to learn what can be achieved with mesh bodies, and what cannot be.

Each creator of a mesh body could use their own UV if they wanted to. But this would be a nightmare for skin creators that create skin appliers, to begin with. Suppose that we have three different mesh bodies, and three different UVs for them, as this picture shows:


Figure 2. Three different arrangements of UVs done with Makehuman

Now, suppose you're a skin creator, you have ten skin tones, and you want to offer appliers for the three mesh bodies, so your customers can purchase the appliers that fit with their body. This means that you should work the ten tones over three different UV configurations. It sounds like a lot of work!

Instead of this, what mesh body creators do (at least, the creators of the four mesh bodies I've tried), is to unwrap their mesh bodies so they conform to an already known UV that saves a lot of work to skin and clothes creators. This UV is the UV of... the default SL avatar.


Figure 3. The UVs of the SL avatar upper and lower body

Still, making skin appliers is no click and go. Each mesh body has their own appliers system, which means creating a different set of HUDs per body, and skin creators could also need to retouch the tones of their skins, fix mistakes, then upload them again.

Actually, when I've said "at least, the creators of the four mesh bodies I've tried", that wasn't 100% accurate. There's a mesh body from the four I've tried, Belleza Venus, which has different UVs for hands and feet than the UVs of the SL avatar. This means that skin creators making appliers for the Venus body, have to redo the textures of their hands and feet, in all the tones they consider they will be supporting. This may also have consequences for clothes creators making appliers for this body.

We will continue in the next issue, but before closing this first part, I'd like to point one consequence of all we've explained here.

We've pointed out that some body parts, like the Belleza Venus hands and feet, do not conform to the UV of the SL avatar. There is no script solution for this. A script cannot magically transform one texture conforming one UV, to a different texture conforming another UV. A script can apply a texture onto the faces of a mesh. And that's it. The texture needs to exist. This means, the creator has to create and upload it.

This is why not conforming to the UV of the SL avatar is a bad idea. There's already a lot of work to do creating appliers for all the systems and brands a creator decides to support. Giving them more work than necessary is not a good idea.

Now, yes... See you in the next issue! Enjoy your SL.

Monday, December 8, 2014

Your Zero-Lag Events Avatar

This article was published in Fusion Magazine, November 2014. Click for the magazine!

Do you like shopping events? I do! But if there's anything that can ruin the experience, that is lag. Currently, the large amount of mesh attachments in our avatars, together with the high resolution textures that many of them use, provoke slow rez times that test our patience, not to mention all the stress over our graphics cards and viewer crashes.

All this could be alleviated if each of us stopped by events, particularly on the first days (when they're the most crowded), in an avatar prepared to use the minimum possible amount of resources.

We may think that this is not our problem and that people should upgrade their machines. But the truth is that we do not know if people could actually upgrade their machines, or if their slow connection could be upgraded to a faster one. We don't know. But we know this: with a little collaboration on our side, we will be contributing to improving everybody's SL experience, including ours, being smoother when visiting crowded places, such as shopping events.

A very easy way to do this, which will make of you the lowest lag avatar possible, both from the script side and from the mesh/textures side, is creating an outfit that will make us completely invisible, without attachments. Outfits have a great advantage: using them is immediate. We don't have to look in our inventory for all its parts, we only have to wear the outfit, to replace our current one. How do we do all this? That's what we explore now.

First of all, we may want to save our current outfit. Click on the Appearance button.


This opens a window. Then move your mouse to the bottom of the window that opens, and click the down arrow next to Save As.


Give your outfit a name and click OK.


Now, detach everything you're wearing. If you don't know what you're wearing, you can access to the WEARING tab of your inventory.


Then right click over each item, and either Detach (if it's an object) or Take Off (if it's a clothing layer). Beware that we are not able to take off our skin, head base, eyes and shape. Our avatar will always be wearing one of these items, the rest are optional. If you're a Firestorm user, you may want to leave the bridge attached. It's not going to be an issue for scripts lag.


We could now look for an already done completely transparent alpha layer, but let's take this opportunity to learn how to create our own. First, close the Appearance window, and open your Inventory. Locate the Body Parts folder, right click with your mouse over it, and select New Clothes: New Alpha Mask


Rename it as something like Full Alpha, and Wear it. Once worn, right click on it, and Edit. You will see a window like this:


Making a full alpha is the simplest case, for we don't have to drop any textures on these boxes. All we have to do is tick all the checkboxes, like the next picture shows (we'll see our avatar vanishing as we tick boxes), and then hit the Save button at the top of the window.


Once we've done this, we save this outfit as we've learned before, giving it a name as Invisible - Ready for Events (or anything along these lines that makes sense to you).


Whenever we want to wear it, all we have to do is open up the Appearance window, right click over the outfit, and select Wear - Replace Current Outfit.


This will immediately replace our outfit, and we'll be ready to visit the event, causing the least lag possible to other avatars, and of course, to ourselves.

Share this with your friends, and help events being more lag-free places!

See you in the next issue. Enjoy your SL.

Thursday, November 6, 2014

Bring the Spooky in your Windlight settings

This article was published in Fusion Magazine, October 2014. Click for the magazine!

Halloween is upon us! Many of us are already outfitted and roaming SL in a quest for spooky places. Many of us also love taking pictures in SL, to keep memories of all the mischief happening. How about enhancing those memories with a touch of windlight? Do I hear, you're not sure about what windlight is? Then don't worry, because this article is for you.

Windlight is SL's atmospheric rendering system. Our viewers give us a set of settings that allow us to change how the sky looks, the light, Sun position, and other ambient effects, such as fog, clouds... Each of us can change the windlight settings in our viewer. By doing so, we're changing how the sky, light, etc. are rendered, but only in our viewer. Our choice of windlight settings is local, meaning, only we can see it in our viewer, not other avatars around. But that is fine when all we want to do is take pictures.

Now, don't worry because it seems like we need to learn a lot of things in order to use this windlight thing. In this issue we'll begin with the basics: we'll learn where we can find this in our viewer, we'll see a few shortcuts for some third party viewers, and then we'll explore a few presets that we can use for our Halloween-Spooky oriented pictures. Yes: There are premade presets that we can just select and use. Starting to use windlight is that easy.

In the official viewer, the windlight settings can be found under: World: Environment Editor: Environment Settings

In order to select a specific windlight setting, we have to change the selection under Sky/Day Cycle, then Fixed sky, from Default to the setting we wish to use. For example, the picture shows how to change our setting to Blue Midday:


which immediately changes the light settings in our viewer. Press OK to have them applied.


Other viewers, like Firestorm or Singularity, have quick access to the windlight presets at the bottom right area of our viewer. For example, in Firestorm we would click the little icon to the bottom right of the screen, normally next to the AO button:


and that would open the Quick Preferences, which among others, let us to select a Windlight preset under WL Sky (and WL Water for similar settings, only for the water):


Let's make a list here of some presets that everybody has installed in their viewers, ready for Halloween:

  • Blizzard
  • Foggy
  • Funky Funky Funky
  • Ghost

These options aren't bad, but it's true that, to begin with, the official viewer doesn't give us many choices. Don't worry, though, because lots of people have created their own presets, including Torley Linden, and offer them to other SL residents. What would we do with them?

First, download the settings to your computer. Open this link in your browser, from the official wiki page, and start by downloading Torley's ones:

http://wiki.secondlife.com/wiki/WindLight_Settings

After this, you will have to unpack them in a specific folder. Depending on your Operating System, the Secondlife folder will be placed in one or other place. The previous link to the official wiki lists them:

Linux:              ~/.secondlife/
Mac:                 ~/Library/Application Support/SecondLife/
Windows Vista & 7:  C:\Users\USERNAME\AppData\Roaming\SecondLife\
Windows XP:         C:\Documents and Settings\USERNAME\Application Data\SecondLife\

Once you've found this Secondlife folder in your Operating System, the sky presets have to be saved under:

user_settings/windlight/skies

and the water presets (if any) under:

user_settings/windlight/water

Once you're done, next time you log in using the viewer you installed the presets for, you will have them available in the same dropdown menu we used before. If you're using a third party viewer such as Firestorm, note that instead of Secondlife or .secondlife, the folder to look for is named Firestorm (or .firestorm for Linux users). Also, many third party viewers come with lots of Windlight presets installed, so for example, you may not need to install Torley's ones in them.

For Halloween, I would recommend trying out all the presets from Torley that are in the FOGGY, HORROR and NIGHT categories. A few personal choices:
[TOR] FOGGY - Das fog
    [TOR] FOGGY - Silent heck
    [TOR] HORROR - Bloody moon
    [TOR] HORROR - Castle vain
    [TOR] HORROR - Darkside tales
    [TOR] HORROR - Dullard
    [TOR] NIGHT - Moony
    [TOR] NIGHT - That spells moon (1 to 4)

As a final note, know that you can also change the Sun position! In the official viewer we can use two ways. One thing that we can do is go to the World: Sun menu, and in there, select one of the four default positions, corresponding to 12 AM (Midnight), 6 AM (Sunrise), 12 PM (Noon) and 6 PM (Sunset).


Then, and this is a little more complicated: Go to the World: Environment Editor: Sky Presets: Edit Preset menu. This opens the following window, where we begin by selecting the preset we'll be using:


Making changes here will overwrite the preset. In order to avoid this, the first we do is a copy of the preset we're tweaking by writing something more under Preset Name, for example, Funky Funky Funky - My Sun Changes in this example, which will create a copy of the preset under this new name:


Now, we click on the Lighting tab, and we drag to move the green dot in the Sun/Moon Position slider, to change the Sun position:


Once we're done, we have to go again to World: Environment Editor: Environment Settings, and select the modified preset we've just tweaked by changing the Sun position, then hit OK:


We can of course change the Sun position over this work copy we've created, not creating more and more copies of it. The purpose of creating this first copy was not to lose the original setting, but with this done, now we can reuse it and tweak saving over it as much as we need.

This will let you experiment what Sun position gives the best spooky feeling for your pictures. It will also change the direction of the shadows, if you're using the Advanced Lighting Mode with shadows turned on.

Finally, if you're using a third party viewer as Firestorm, you can quickly change the Sun position by using a slider, without having to save a different preset for this! Just notice that under the WL Sky and WL Water selectors there's a color band representing the times of the day, and a slider that lets you drag and so change the Sun position:


With all this, now go out and take lots of fun pictures. Happy Halloween!

Enjoy your SL.

Thursday, October 2, 2014

Keep your inventory under control (Part 6)

This article was published in Fusion Magazine, September 2014. Click for the magazine!

Disclaimer: The screenshots and brand names shown in this article do not reflect in any manner, any preference that Fusion could have for specific stores. They show up merely as examples, coming from the inventory of the writer of this article.

Greetings everybody! With the advent of mesh body enhancements such as hands, feet, breasts and whatnot, our avatars, currently, may look smoother and more detailed than the default SL avatar. In order to use said body parts, fashion creators provide a variety of appliers and add-ons. Appliers are HUDs that load into the mesh part the corresponding texture: skins, tattoos, lingerie, tops, pants... Add-ons are (rigged mesh) objects that conform to specific body parts: rings for mesh hands (in specific poses), anklets for mesh feet (again, specific feet poses) and so on.

All these items have improved our appearance a lot, but in exchange, sorting our inventory in a way that makes sense has become more confusing. Also, some body parts require specific feet/hand sizes, while when not using them, our avatar better fits other sizes; dressing in itself has become more complicated.

We'll explore here some ideas I've been testing through time, that have helped me in performing these tasks faster, always finding everything I need with very few clicks. Hopefully, these ideas will help you develop your own strategy that works for you.

First of all: How do we go about having all of our body parts, controller HUDs, skin appliers, etc. accessible?

I have the body parts under the Body Parts system folder, and said folder in my inventory looks like follows, which works for me:


The body parts I use the most are accessible at the top, by using the [] characters to enclose the brand. All of the body parts that I barely use, are under a [Z] Parts - Not Used Often folder, so the Body Parts folder doesn't get too long a list of folders that would force me to scroll down in order to find things.

The hands pose I use the most is one click away under the [Slink] Hands folder, and then all the other hand poses under a subfolder (again, avoiding having to scroll down to find the hands pose I use the most.)

Then, mesh bodies require a different size of hands and feet than my own shape does, so I keep those sizes within the corresponding mesh body folder. Notice also how I do the same with the hands pose: The relaxed pose is accessible directly under the mesh body folder, while all the other poses in that size are stored under a subfolder.

Remember, this is just a suggestion! It may not work perfectly for you, so use it just as a starting point to develop your own system.

Once we have all the body parts organized, we can use a little tip to easily find of our clothes/shoes/etc. that work with said body parts.

Suppose you have a folder with lingerie that comes with appliers for both the Slink feet and Gos shoes. You could rename that folder this way:

Lingerie Folder {Slink}{Gos}

What do we achieve with that? If we now start typing the following in the Search bar of the inventory window:

{Gos}

every folder that was labeled with {Gos} will show up in the search, making very easy to choose something that will work with those shoes. If we have a dress that has appliers for Wowmeh, Physique and Lolas, by renaming it this way:

Dress Folder {Lolas}{Wowmeh}{Physique}

we are making it easy to find when we look for out items that work with either of the three. You can of course choose your own way of writing the body parts. If {Wowmeh} and {Physique} are too long, {Wowm} and {Phys} could work good enough.


A closing suggestion: create outfits with your most used body parts. For example, create an outfit where you would have a mesh body on with the corresponding hands and feet sizes for it, if you use mesh bodies. This would allow you to quickly switch to that body and the correctly sized hands and feet for it. Then all you have to do is dress over that mesh body. Outfits can be really useful. If you haven't used Outfits yet, don't worry: soon we'll talk about more uses for them, and how to create them. But for now, we're closing this Keep your inventory under control series.

I hope you found it useful! See you in the next issue. In the meantime... Enjoy your SL!

Thursday, July 31, 2014

Keep your inventory under control (Part 5)

This article was published in Fusion Magazine, July 2014. Click for the magazine!

Greetings everybody! We've talked about boxing (using boxes to store our items), and even using notecards when packing our inventory, in order to make the total count of items go down.

There are some specialized items that will allow us to use some assets, even if they are packed: pose HUDs and texture organizers, to mention a couple of examples. This is extremely useful: while some of our assets are packed, we can still use them as if they were unpacked.

So what are these interesting tools we've mentioned?

A texture organizer, for example, is an object that will allow us to browse the textures we put in it, not needing to have the textures unpacked in inventory: when we need one, we just click on it in the organizer, and it will deliver us a copy. We use it, and delete it when we're done: it will still be in the organizer... and if we're extra-careful packing, in a backup box. (If we're extra-extra-careful, we'll also make a copy of the texture organizer. Things happen all the time.)

What features would be nice in a texture organizer?

As many categories as possible, ability to label the categories as we wish, search function, remove duplicates function, rezzable and HUD at the same time. Extra bonus if it recognizes sounds and animations. This is a tool particularly useful for builders and designers in SL.

A pose HUD is also a very helpful tool, especially if you are into SL photography (if you plan to be a blogger, you will need this). We may have in each of our pose HUDs thousands of poses that don't need to be unpacked in our inventories, and browse them easily, selecting which one we want to use at any moment.

What features would be interesting on a pose HUD?

Again, as many categories as possible, ability to label categories, search... but also, facial expressions, eye movement, ability to make at least one more avatar to pose. Perhaps we don't find all these together in a single HUD. If that's the case, know that there's a free HUD that will allow you to control facial expressions and eye movement, if you don't find an all-in-one that is within your budget. Look in Marketplace for Anypose Expression.

Texture organizers and pose HUDs will have a specific requirement: Do not add a no-copy asset. This is for technical reasons, but it is also important to bring it up, because we have to be really aware of the following fact:

If we drop just one no copy asset into just one box of a big linked object, the whole object is going to turn into no copy in inventory, and this is a risk. I would suggest packing no copy items separately, to avoid the risk of losing one of our packing boxes because of SL eating no copy items. Keep an eye when packing, because at times it's a no copy ad (texture) among all the copy/no transfer items, or a no copy alpha layer... and just that will make your packing box quite vulnerable to a SL mishap.

We'll continue in the next issue, with the last part of this series: Appliers and outfits. We're almost done!

Enjoy your SL.

Monday, June 30, 2014

Keep your inventory under control (Part 4)

This article was published in Fusion Magazine, June 2014. Click for the magazine!

Greetings everybody! In the previous article, we went through a lot of information and tips in order to help us when packing our inventory. Then it was mentioned that in this one we would talk about several ideas to delete items that have already been packed. So, let's go for it.

The first idea is quite immediate: If you have packed an outfit that contains mesh clothes, and you don't plan on changing your shape often, then keep only your size and delete the rest. In the event you do change your shape, you can always rez the packed object, look for the outfit (here is where having used descriptions, as previously suggested, helps!), and extract a new copy of the size you need now.

Continuing with this, we can go a bit further. Many fatpacks contain a box with each color, that we have to unpack one at a time. Those fatpacks will contain a copy of the alpha layers with each color. We don't need to keep a copy of the alpha layer for every color. We can just arrange our fatpack as the image shows.


In the event all items have the same name regardless of color, the picture shows how we can help ourselves organize our fatpack anyway.


The same can be said for other items that are often contained in each color of a fatpack: landmarks, notecards, textures with the ad/photo of the product. Keep just one for the whole fatpack and only if you really need it. As for the landmarks, we don't even need one per fatpack copy. We just need one landmark per store.

Since we're on the topic, did you know that you can embed landmarks into a notecard?

Notecards aren't the safest way of storing items, but for landmarks, they are good enough. So we can categorize our landmarks, for example, using two notecards (e.g., Places to visit and then Stores), and then hit enter to create new lines, and start dragging and dropping landmarks from our inventory to the notecard. We can of course write down headers to sort our landmarks within the notecard, and finally save it.


Once the notecard is saved, we can delete the landmarks from our inventory. As a final step, to begin decreasing the number of items in inventory, we should purge the trash. But before purging trash, make sure there's nothing valuable in there! If you purge trash and remove something by mistake, LL will not be able to recover it for you.

This last item is not related to sorting notecards, but it's also worth mentioning: Recently, embedding calling cards into notecards was also enabled. We still cannot store calling cards in boxes (the reason is technical), but we can save them in notecards and remove those we don't need.

We'll leave it here for now and continue in the next issue. Well done so far!

Enjoy your SL.

Saturday, May 31, 2014

Keep your inventory under control (Part 3)

This article was published in Fusion Magazine, May 2014. Click for the magazine!

Greetings everybody! In the previous issue we learned the Search feature, which helps us find even the most hidden items, and serves also as a filter to speed up our sorting task. In this issue we're going to talk about packing.

Why packing?

First, because exactly as happens in the real world, there are items we stop using. From clothes to videogames to shoes, all those items have a moment in our lives. Many deteriorate and we have to throw them away. Others don't deteriorate, but we use them no more. In SL, it happens the same.

But second, and perhaps more importantly, because by packing, we may reduce the total number of items in our inventory. This has good consequences: it's easier to find what we're looking for, and we don't have to wait an eternity whenever the inventory reloads entirely.

Packing in SL doesn't mean getting rid of our items permanently. It means storing them in placeholders that will use less of our inventory space than the items themselves, unpacked.

Packing requires a specific prerequisite: rezzing and linking boxes. We will be assuming this knowledge here, but don't worry. If you don't know what this rezzing or linking boxes mean, the following link from the knowledge base will give you a good start: http://community.secondlife.com/t5/English-Knowledge-Base/Build-Tools/ta-p/700039

Why do we need to know this? Let's think about this, with a practical case: We are going to pack all of our gowns, and do some cleanup after that (Guys, you can pick something different, like suits. Unless of course if you also like to wear gowns.)

Suppose that we have all of our gowns correctly sorted. There will be gowns using system layers and flexi skirts that perhaps nowadays we do not use, and there will be mesh gowns in all their sizes and colors.

Let's count all of them. How many gowns do we have? Six? Twenty? One hundred and thirteen?

Then rez a box, duplicate it, repeat... until you have as many boxes as gowns. You may of course arrange said boxes in rows and columns. (If you are the case of one hundred and thirteen... You will need this!)


Let's add a tip here: If you rez a box, duplicate it, and link the two boxes, now you could duplicate them... Having quickly, four boxes. And if you link those four boxes, then duplicate them... That's it, now you have eight boxes. If you are in need of a high number of boxes, this technique will speed the process quite a bit.

Since we're talking about tips, let's add something else here: when you link all the boxes, then edit the linked set, click the Features tab and change the Physics Type to Convex Hull. That will make, in almost all cases, for the Land Impact count to halve (if there are many scripts, then it may be slightly higher).


Yet one more tip: You can change the Physics Type right in the first box: the property will be duplicated when you duplicate the box, so when you link the first couple of boxes, the Land Impact of the two linked boxes will be just one.

Now, we can use the Name or the Description field of each box, for the purposes of labelling what we're packing: it depends on if identifying the items in each box is relevant for you, or not. It is for me, and this is how I proceed each time I pack:

First I rez and link all the boxes I may need. Then I edit the boxes, and click a checkbox named Edit linked. This allows me to select each box individually. Now I click the first box to select it. I use the Description field to copy/paste from my folder name, the label that will allow me to identify the item inside. Then I click the Content tab of said box. Then I select all items in my inventory, hold the CTRL key pressed, and drag the items from my inventory to the box. I wait to see the inventory of the box reload, then I click the next box, and repeat the process.


Why have I said to hold the CTRL key pressed? It could happen that among the selected items, there are scripts. If we do not hold the CTRL key pressed, the scripts will attempt to execute once inside the box. This may create all sorts of havoc. To make sure that nothing regrettable will happen, always hold the CTRL key pressed (Yes, there are scripts that could delete your linked boxes, and if a script deletes your boxes, there is no way to recover them. Double ouch if you were packing no copy items. Always hold the CTRL key pressed. Always.)

As a little side note: Do not drop more than 100 items at a time inside your box. This could cause inventory creation issues, and it's a pain keeping up with it. If a folder contains many, many items, select several at once, drag them from inventory to the box, wait for the inventory to reload, select more items, and repeat.

Why have I used the Description field rather than name? Because once I'm done, I untick Edit linked and then give the whole set a Name such as Gowns - Packed 2014/05/12, which will be the name showing in inventory. That way, when I look in my inventory and read the name of the object, I know what's inside the boxes, and when was the last time I packed.

Make sure that you are doing this at a place where you can rez. In order to pack, you need to rez inworld. If you don't own land, you may look for sandboxes.

We can now proceed and pack all the items in our inventory. The first time, this may be a very painful (time consuming) task. But once we get in the habit, packing each three-six months (depending on our shopping habits) will not take more than a morning, and we'll keep our inventory in really good shape.

In the next issue we'll talk about several ideas to delete items that have already been packed, in order to free space from our inventory. Keep up the good work!

Enjoy your SL.

Wednesday, April 30, 2014

Keep your inventory under control (Part 2)

This article was published in Fusion Magazine, April 2014. Click for the magazine!

Greetings everybody! In the previous issue we started deciding on a folder structure to begin sorting our items, and we learned how to open a second inventory window, which makes the process easier. It's safe to assume that after a month, we've advanced some bits in our task of keeping our inventory sorted, by sorting all of our clothes. What would be next?

Next would be making sure that we haven't forgotten any piece of clothing. When inventories have been unchecked for a long time, it's easy to not see items, especially if they're hidden under piles of Sort this later folders (Haven't we all done this?)

How do we make sure that we will be able to find our items, no matter how hidden they are?

By using the search feature of the inventory window.

We can use this feature in two modes: basic and advanced. In basic mode, we simply begin to type the name of the item we're looking for, and as we type, the viewer shows all the items containing that text as a part of the name.


This way, we can start to look for missing accessories, garments, etc. For example, type neck and likely most of your necklaces will show up, type ear and many earrings will show, and so on. Of course, this relies on the creator having given the item a name that makes sense, but this is usually the case. And if you still feel that items are missing somewhere in your inventory, instead you can type a store name, or the abbreviation. Creators often include their store names in the folder name, so this can make it easy to find their items.


As mentioned, there's also an advanced search mode. This consists of using a filter: The search text we type would be restricted to one more criterion. Which criterion? We can restrict by asset, the type of item we're looking for. For example, we may be looking only for notecards. Or we may be looking only for clothing layers and objects. So we would proceed this way, in the official viewer from LL (Firestorm has a Filter option right under the search edit box, other viewers may differ):

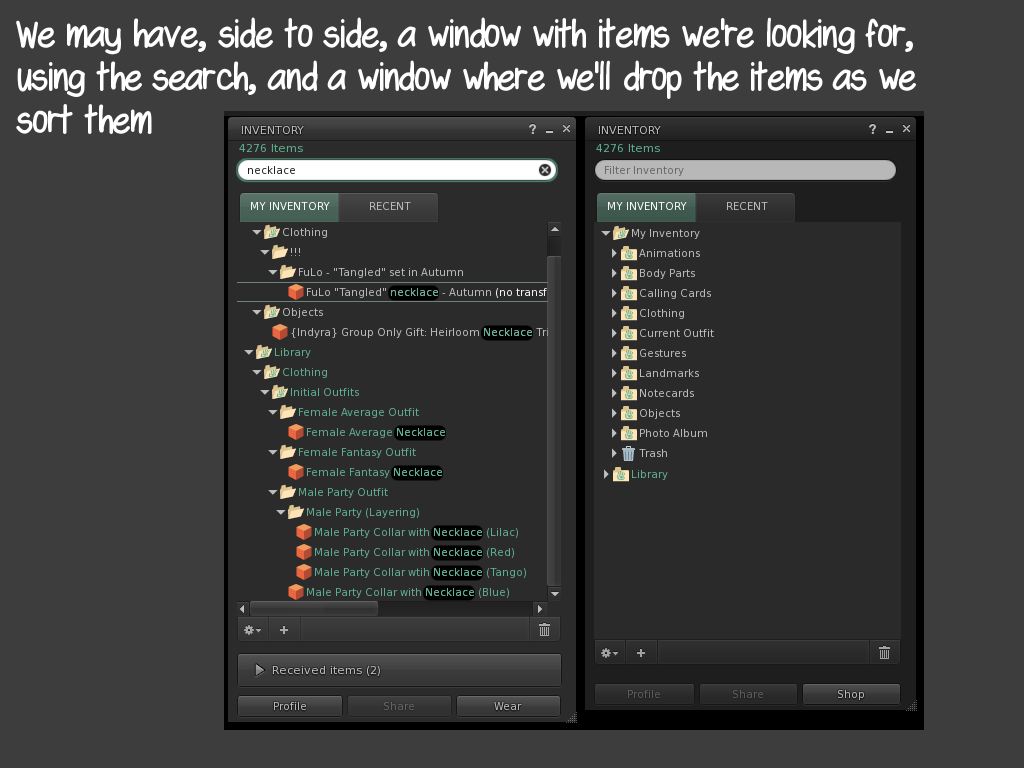
Open your inventory window if you haven't already, and click on the gear icon. Then click Show Filters from the menu that pops up. That opens a secondary window with checkboxes for the kind of assets we would like to include in our search. The way to proceed is: First, begin typing your search text, then untick boxes to restrict the kind of asset you're looking for.

This is very handy, because, as we know from the previous issue, we may have two inventory windows showing when sorting our items. So we can indeed have one of the windows where we use the Search tool to find our items, and the other window, where we have focused in our categorized structure, to move the items we find.


Make sure to complete sorting all of your clothes, for in the next issue we'll talk about packing: We don't want our inventories to run wild with hundreds of thousands of items!

Enjoy your SL.

Monday, March 31, 2014

Keep your inventory under control (Part 1)

This article was published in Fusion Magazine, March 2014. Click for the magazine!

Greetings everybody! Without further ado, let's start our sorting inventory task.

The first thing to do is to decide how to arrange our items, and create a folder structure in our inventory that reflects this. We'll study how to do this for the Clothing folder. When the concepts are clear, we will consider some suggestions on how to sort our objects (furniture, etc), notecards, landmarks, attachments, etc. Then of course, you will adapt it to your own way of organizing.

This is very important: The arrangement has to make sense to our way of searching for items.

When you are after a certain outfit look... Do you search for a dress style? Do you expect that dress filed under a store folder? How about the accessories?

Those questions are relevant because they'll tell you if your folder structure should categorize clothes first by item type, or if you should make store names the top category... or even, if you would need of a mixed structure, only to mention a couple of possibilities.

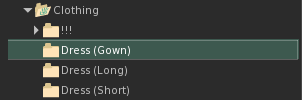
So, if you feel that searching items for style is more intuitive to your way of looking for things, go ahead and, within your Clothing folder, create several subfolders named, for example, Dress (Long), Dress (Short), Dress (Gown), Tops (Summer), Tops (Winter), Skirts (Long), Skirts (Short), Pants (Short), Pants (Capri), Pants (Formal), etc.

If you feel that searching items for store name is more intuitive to your thinking, then, within the Clothing folder, create several subfolders named Store A, Store B, Store C, etc.

You don't know how to create folders? Worry not, it's very easy.

Begin by right clicking over the Clothing folder. This shows a menu with several choices, click on New Folder.


This immediately creates a new folder named New Folder. The cursor is placed so you can type a different name. Type, for example, Dress (Long) and then hit Enter.


If you now right click over this new Dress (Long) folder, you can create subfolders within. Go ahead, create the structure you've decided under Clothing. Don't worry if you haven't figured all the possible categories yet! Over time, you will realize which new folders you may need, and you can create them right at that moment.


Once we've created our folder structure, it's time to begin moving items from our current folders, to the ones we've created. Something that will help greatly in this task is having two inventory windows open at the same time, so we click one or more items and drag them from one location, to the other (definitive) folder.

You didn't know we can have more than one inventory window open at the same time? We can, and it is very useful.

In the official viewer, look for the gear icon below your inventory list. Click it to open it, and you'll find the option within the menu that shows: New Inventory Window.


Click that option, and ready! A secondary inventory window appears, which is very useful for moving items to the desired folders. (In other viewers, we may find this option under an Inventory menu, New Window.)


This would be all that we need for our first step organizing our inventory: think how it is natural to you, categorizing your items, then create a folder structure to represent it, and then move all the folders and boxes within the corresponding place in the folder structure that you've designed.


More, in the next issue.

Enjoy your SL.

Friday, February 28, 2014

Keep your inventory under control (Introduction)

This article was published in Fusion Magazine, February 2014. Click for the magazine!

Greetings everybody! If there's something unpleasant, yet necessary to do in SL, that is sorting inventory. On one hand, it's frustrating to search for an item we want to use, and not being able to find it. On the other hand, an excessively large inventory may carry with it some bad side effects.

The first important thing to realize is that this is a task that has to be performed periodically. If we sort our inventory today, depending on our shopping habits, perhaps we need to sort it again every other week, every month... The frequency is not the same for everybody, but it is something you'll have to do from time to time.

If this is the first time you're going to seriously sort your inventory, or if it's been a long time since you last did... Keep in mind, this is no five minute task. It may take you from several hours to several days. It depends on how many items are left to sort, and how thorough you want to be.

As a matter of fact, even setting our mindset to inventory sorting, and establishing a routine that works for us, takes some preparation. For this reason, we'll be outlining here the stages that will be developed in future articles.

We will first talk about choosing a folder structure for our inventory that reflects the way in which we naturally look for information. This is a personal decision, and so several alternatives will be presented. We have to think which structure works better for us, and so decide.

After this, we will see how to create this folder structure in our inventory, and which tools SL has that allow us to move items, create copies or even special copies called "links."

Once our inventory is organized, we aren't done. We have to get used to packing, otherwise, our total number of items will grow out of control. It's a good idea to do our sorting and packing at the same time, but while we learn, we will do this in separate stages.

When packing, we will realize that there's a lot more than clothes in our inventory. Textures, poses, notecards, furniture, landmarks, calling cards... What do we do with all this? We will study some tools created by SL residents, learn about embedding in notecards, and more.

Join me, starting in the next issue.

Enjoy your SL.

Friday, January 31, 2014

Links. Scam, or legit?

This article was published in Fusion Magazine, January 2014. Click for the magazine!

Greetings everybody! The rise in incidents of stealing accounts by spreading misleading links has made many people become so scared of links, that they refuse to click any of them. This may cause us to reject valid, beneficial links, because we systematically reject links without understanding why. This article's goal is to explain how web addresses are built, so we can understand what makes a link valid, or not.

In a nutshell, a link consists of three main parts:

Protocol://Server/Page

Protocol specifies technical details about how the information is transferred. We don't need to know the details, but at least recognize the most used ones: http and https.

After Protocol, we always find the characters :// together. What comes next, before the next / character, is the server. Then, after the following / character, what we find is the specific page within the server (which may be located under a certain folder, so we may find several / characters).

The important thing for us is to learn how the server name is built.

First: Server names are built of two or more parts. Parts are always separated by a dot . character.
Second: At a minimum, there's first a domain name, and following that, a top level domain (TLD) like com, com.es, gov, co.uk, etc.

For example:

http://secondlife.com/

The Server is secondlife.com. The domain name is secondlife. The TLD is com.

Then, there may be at least a subdomain name preceding the domain name. It will also be separated by a dot from the domain name. For example:

http://wiki.secondlife.com/

This link is the wiki subdomain within the secondlife domain, TLD being com.

Official links from SL will always have secondlife as domain, com as TLD.

Phishing links are built by creating domain names that resemble to the original names, to trick us.

Now we can understand why the following links are not valid SL links:

http://market.secondlifecom.com/
(Domain name is... secondlifecom? That's not secondlife!)

http://altervista.secondlifemarket.co.uk/
(Again, domain name is not secondlife)

http://marketplace.seconlife.com/
(Double check domain names for spelling! This one says seconlife, that's not secondlife!)

and why the following links are valid:

https://id.secondlife.com/
https://marketplace.secondlife.com/

Remember before entering any login and password data to check in your browser bar the web address. If it does not conform to the rules explained, then do not enter any data.

Stay safe. Enjoy your SL.

Tuesday, December 31, 2013

Scams? Phishing? I say, no thanks!

This article was published in Fusion Magazine, December 2013. Click for the magazine!

Greetings everybody! Christmas is upon us, and with such a big celebration come many purchases. Sadly, this also means that there will be people in the shadows trying to take our money without our consent. Any of us may be affected by this, so my goal for this issue is to provide some basic guidelines to help you protect yourself from the many thieves that exist online, and particularly, in the world of Second Life®.

These guidelines are based on two that our mothers always told us:

  • If something looks too good to be true, then it probably is
  • Do not accept candy from strangers

The last guideline translates this way to SL: If a stranger sends an object to you, delete it immediately. Do not rez it. Do not wear/add (attach) it. Simply, delete it. Don't worry about just receiving it: that alone will not hurt you nor will it compromise your account. Just delete it, and you will be safe. We'll expand this information in another issue.

What about "If something looks too good to be true..."?

This is how, sadly, many accounts have been stolen from their users: they offered a link that reads somehow similar to a SL Marketplace link. After logging in with our password, the thieves have our login information. They use this to log into the SL website, change our password, take all of our money, and use the stolen account to continue spreading the links to the groups the victim was into.

A sure way to know that we are going to a legitimate SL web page is to type the address ourselves in the browser address bar.

http://www.secondlife.com/

This will never fail us. We'll talk in the future about how we can know that an address is safe.

I don't want to close this issue without mentioning a recent scam. If you're receiving Buy Cheapest Linden Dollars offers, report the avatar immediately. "If something looks too good to be true..." plus, LL changed the Terms of Service (TOS) this year in this respect: only third parties explicitly listed by LL in the official wiki page, are allowed to sell L$ to you. Anybody else that is not listed in that page, is someone you should not trust.

The official wiki link is:

http://wiki.secondlife.com/wiki/Linden_Lab_Official:Linden_Dollar_(L$)_Authorized_Reseller_Program

With all this information, I hope your purchases will be safe. Have fun, and enjoy your SL.

Saturday, November 30, 2013

Turn that light off!

This article was published in Fusion Magazine, November 2013. Click for the magazine!

Greetings everybody! My name is Auryn Beorn and this is my first article for Fusion. I will try to approach some topics that could be considered too techy for the betterment of your enjoyment in your SL experience. My philosophy is quite simple: the world of SL is a big place with so many different people and tastes; hence, learning the tools that allow us to minimize exposure to what we do not like, will be always beneficial for us. It's my wish that these tips will help you enjoy your SL.

I'm opening the field with facelights. Like them or not, they'll be present whenever we teleport to an event, club... Normally, the avatar wearing them, is not aware of what everybody else sees. Likely they haven't learned about windlight, and they don't see themselves right without the facelight.

This girl could light a city on her own.

Attacking the avatar that wears the facelight will solve nothing. What we can do is to deactivate them in our viewer. Easy and clean.

How do we do this?

We will have to open up our preferences (Me/Avatar: Preferences or CTRL P), and go to the Graphics tab. Make sure you have access to the advanced options (Advanced button). In there, we can find an option named Local Lights under Shaders: untick it.


This has one drawback: No local lights will be rendered. Local lights refer to light points that aren't the SL Sun/Moon. That is, all the other lights coming from objects.

But we have more choices.

We can start by derendering only the attached lights. We find this under the menu Develop: Rendering: Render Attached Lights. Un-ticking this option, the result is that only the lights attached to avatars will not be rendered. All the other lights will be rendered. (If you see no Develop menu, activate it under Advanced: Show Develop Menu. If you see no Advanced menu, CTRL ALT D for it. Almost, if not all current viewers, have these options.)


If you don't want to derender the attached lights, you have also the option, under some viewers, of derendering the avatar of your choice. Temporarily or permanently, but when an avatar is derendered, the attached lights go away with them.

Yay! Lights are gone!

Whichever your choice, don't forget to turn the lights back on when you need them!

Simply activate what you deactivated in the first place, and that's it: the lights are back when and where you have full control over them.

Enjoy your SL.