Greetings everybody! Without further ado, let's start our sorting inventory task.
The first thing to do is to decide how to arrange our items, and create a folder structure in our inventory that reflects this. We'll study how to do this for the Clothing folder. When the concepts are clear, we will consider some suggestions on how to sort our objects (furniture, etc), notecards, landmarks, attachments, etc. Then of course, you will adapt it to your own way of organizing.
This is very important: The arrangement has to make sense to our way of searching for items.
When you are after a certain outfit look... Do you search for a dress style? Do you expect that dress filed under a store folder? How about the accessories?
Those questions are relevant because they'll tell you if your folder structure should categorize clothes first by item type, or if you should make store names the top category... or even, if you would need of a mixed structure, only to mention a couple of possibilities.
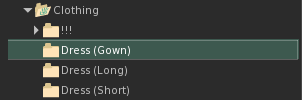
So, if you feel that searching items for style is more intuitive to your way of looking for things, go ahead and, within your Clothing folder, create several subfolders named, for example, Dress (Long), Dress (Short), Dress (Gown), Tops (Summer), Tops (Winter), Skirts (Long), Skirts (Short), Pants (Short), Pants (Capri), Pants (Formal), etc.
If you feel that searching items for store name is more intuitive to your thinking, then, within the Clothing folder, create several subfolders named Store A, Store B, Store C, etc.
You don't know how to create folders? Worry not, it's very easy.
Begin by right clicking over the Clothing folder. This shows a menu with several choices, click on New Folder.

This immediately creates a new folder named New Folder. The cursor is placed so you can type a different name. Type, for example, Dress (Long) and then hit Enter.

If you now right click over this new Dress (Long) folder, you can create subfolders within. Go ahead, create the structure you've decided under Clothing. Don't worry if you haven't figured all the possible categories yet! Over time, you will realize which new folders you may need, and you can create them right at that moment.
Once we've created our folder structure, it's time to begin moving items from our current folders, to the ones we've created. Something that will help greatly in this task is having two inventory windows open at the same time, so we click one or more items and drag them from one location, to the other (definitive) folder.
You didn't know we can have more than one inventory window open at the same time? We can, and it is very useful.
In the official viewer, look for the gear icon below your inventory list. Click it to open it, and you'll find the option within the menu that shows: New Inventory Window.

Click that option, and ready! A secondary inventory window appears, which is very useful for moving items to the desired folders. (In other viewers, we may find this option under an Inventory menu, New Window.)

This would be all that we need for our first step organizing our inventory: think how it is natural to you, categorizing your items, then create a folder structure to represent it, and then move all the folders and boxes within the corresponding place in the folder structure that you've designed.

More, in the next issue.
Enjoy your SL.
No comments:
Post a Comment